
Me ha parecido bueno el prompt que Powerlevel10k permite tener. Desafortunadamente el proyecto detrás de éste parece tener problemas de logística y parece «medio abandonado». La página web en su repositorio indica que hay soporte limitado, no se han arreglado bugs y no atienden reportes1, 🙄. De cualquier modo este prompt sólo aplica a ZSH, y creo que, pese a lo bonito de éste, actualmente hay que pensar más allá del shell. Afortunadamente alguien ya lo ha hecho y el resultado ha sido Starship2.
Jessica Wang (cuyo video incluí en una entrega previa), cuenta con una entrada en su blog3 en la que describe el proceso de instalación de componentes y configuración para lograr con Starship el prompt que Powerlevel10k proporciona (sort of). A diferencia de las instrucciones que Jessica indica, yo he optado por hacer uso del font original4 empleado en Powerlevel10k. Si Warp está abierto debe ser cerrado para que se incluyan los nuevos fonts en la lista que aparecerá en Warp > Settings > Appareance > Text > Terminal Font.
Ahora, en lo que respecta a Starship, lo primero es descargarlo (la página de Ms. Wang3, al menos en mi browser, muestra el comando de instalación en Markdown; siendo que debería aparecer como aquí lo ilustro). En este caso he usado ZSH y he debido usar una cuenta con capacidad de sudoer.
% curl -sS https://starship.rs/install.sh | sh

  Configuration
> Bin directory: /usr/local/bin
> Platform:      apple-darwin
> Arch:          aarch64

> Tarball URL: https://github.com/starship/starship/releases/latest/download/starship-aarch64-apple-darwin.tar.gz
? Install Starship latest to /usr/local/bin? [y/N] y
! Escalated permissions are required to install to /usr/local/bin
Password:
> Installing Starship as root, please wait…
✓ Starship latest installed

> Please follow the steps for your shell to complete the installation:
  bash
  Add the following to the end of ~/.bashrc:

	eval "$(starship init bash)"

  zsh
  Add the following to the end of ~/.zshrc:

	eval "$(starship init zsh)"

  ion
  Add the following to the end of ~/.config/ion/initrc:

	eval $(starship init ion)

  tcsh
  Add the following to the end of ~/.tcshrc:

	eval `starship init tcsh`

  xonsh
  Add the following to the end of ~/.xonshrc:

	execx($(starship init xonsh))

  fish
  Add the following to the end of ~/.config/fish/config.fish:

	starship init fish | source

  elvish
  Warning Only elvish v0.17 or higher is supported.
  And add the following to the end of ~/.elvish/rc.elv:

	eval (starship init elvish)

  nushell
  Warning This will change in the future.
  Only Nushell v0.96 or higher is supported.
  And add the following to the end of your nu config file (find it by running $nu.config-path in Nushell):

	mkdir ($nu.data-dir | path join "vendor/autoload")
        starship init nu | save -f ($nu.data-dir | path join "vendor/autoload/starship.nu")

  PowerShell
  Add the following to the end of Microsoft.PowerShell_profile.ps1:
  You can check the location of this file by querying the $PROFILE variable in PowerShell.
  Typically the path is ~\Documents\PowerShell\Microsoft.PowerShell_profile.ps1 or ~/.config/powershell/Microsoft.PowerShell_profile.ps1 on -Nix.

	Invoke-Expression (&starship init powershell)

  Cmd
  You need to use Clink (v1.2.30+) with Cmd. Add the following to a file starship.lua and place this file in Clink scripts directory:

	load(io.popen('starship init cmd'):read("*a"))()

%
Como lo indican las intrucciones de instalación, se agregó la línea abajo indicada al final del archivo de arranque .zshrc.
eval "$(starship init zsh)"
Adicionalmente, hay que crear un directorio .config y en éste un .toml que puede ser descargado de uno de los muchos repositorio de Ms Wang5. Considerando que estos lugares van y vienen, copio aquí el contenido del archivo, cuyo nombe debe ser starship.toml. Téngase presente que los «cuadritos» y símbolos que aparecen aquí corresponden a glifos que proveerá el font seleccionado.
format = """\
[](bg:#030B16 fg:#7DF9AA)\
[ ](bg:#7DF9AA fg:#090c0c)\
[](fg:#7DF9AA bg:#1C3A5E)\
$time\
[](fg:#1C3A5E bg:#3B76F0)\
$directory\
[](fg:#3B76F0 bg:#FCF392)\
$git_branch\
$git_status\
$git_metrics\
[](fg:#FCF392 bg:#030B16)\
$character\
"""
[directory]
format = "[ ﱮ $path ]($style)"
style = "fg:#E4E4E4 bg:#3B76F0"
[git_branch]
format = '[ $symbol$branch(:$remote_branch) ]($style)'
symbol = " "
style = "fg:#1C3A5E bg:#FCF392"
[git_status]
format = '[$all_status]($style)'
style = "fg:#1C3A5E bg:#FCF392"
[git_metrics]
format = "([+$added]($added_style))[]($added_style)"
added_style = "fg:#1C3A5E bg:#FCF392"
deleted_style = "fg:bright-red bg:235"
disabled = false
[hg_branch]
format = "[ $symbol$branch ]($style)"
symbol = " "
[cmd_duration]
format = "[ $duration ]($style)"
style = "fg:bright-white bg:18"
[character]
success_symbol = '[ ➜](bold green) '
error_symbol = '[ ✗](#E84D44) '
[time]
disabled = false
time_format = "%R" # Hour:Minute Format
style = "bg:#1d2230"
format = '[[ $time ](bg:#1C3A5E fg:#8DFBD2)]($style)'
La página de miss Wang, como en otros lugares, hablan de revisar en Warp > Settings > Features > Session > Honor user’s custom prompt para que el prompt de Starship quede habilitado. Aquí yo tuve que batallar un poco.
Por una parte la mencionada opción ya no aparece en la versión que descargué de Warp. Esta opción la encontré en Warp > Settings > Appearance en la sección Prompt, donde uno debe dar click en el prompt que se muestra para ver la opción de uso del prompt PS1 (aparecerá lo que se muestra abajo).
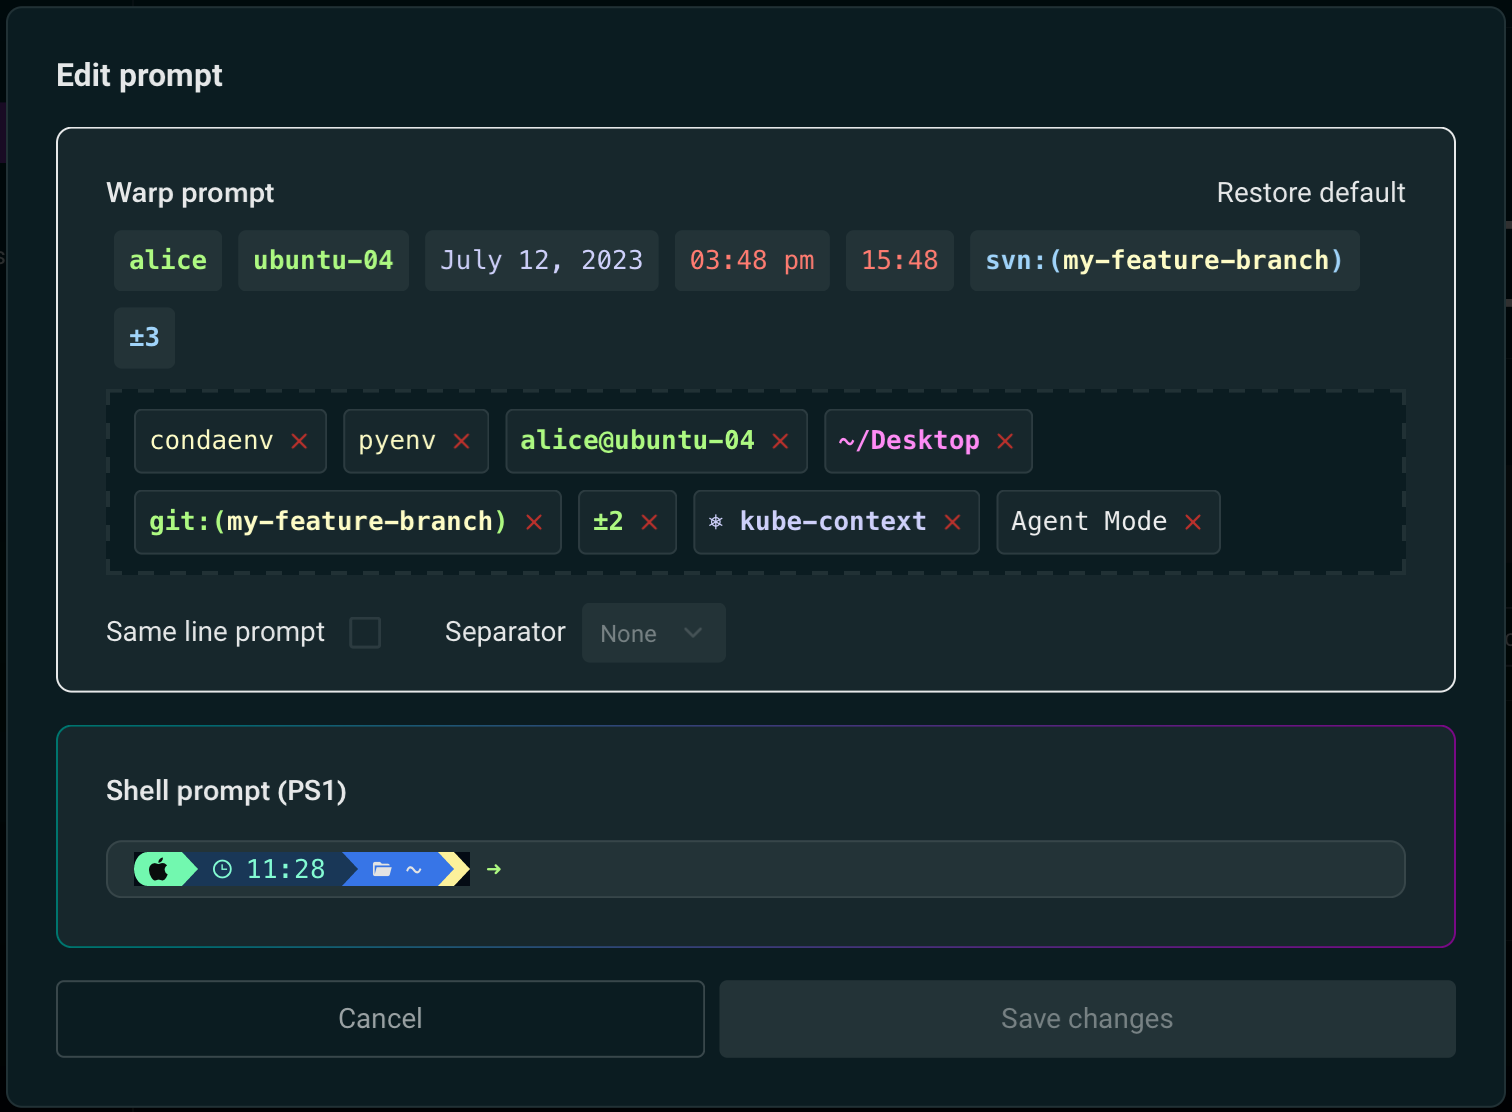
Y, por otra parte, pesar de haber reiniciado a Warp y revisar la configuración de todo varias veces, no fui capaz de ver el prompt de PS1 como se muestra arriba hasta el día siguiente que volví a encender el equipo. Algo a tener presente (me refiero a que siempre es bueno reiniciar el equipo despúes de instalar algo nuevo y desconocido para uno aunque uno esté acostumbrado que muchas veces en macOS esto no es necesario o sepamos que no es estrictamente necesario pero es una buena práctica; no me refiero a tener que esperar todo un día a que el cambio aparezca 😀).
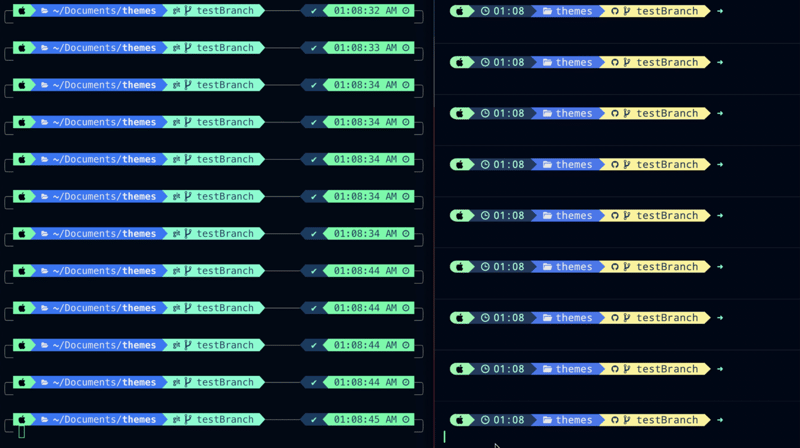
Jessica Wang recomienda un tema para Warp en su post3, yo sólo haré la mención aquí por el momento mientras exploro lo que Warp provee (que por cierto, me hacen preguntar si alguien realmente quiere un tema que tenga una imagen de fondo en la que se pierde el texto 🤔). Como Ms. Wang indica, el resultado (derecha) contra lo que proveía P10K (izquierda) es aceptable.
Referencias
- «Powerlevel10k«, github.com, repository. Visited: 2025.03.13. URL: https://github.com/romkatv/powerlevel10k.
- «Starship. Cross-shell prompt«, starship.rs, web. Visited: 2025.03.13. URL: https://starship.rs/.
- Jessica Wang, «How to Configure Starship to Look Exactly Like P10K (zsh + Warp + MacOS)«, dev.to, blog. Published: 2023.03.27; visited: 2025.03.13. URL: https://dev.to/therubberduckiee/how-to-configure-starship-to-look-exactly-like-p10k-zsh-warp-h9h.
- «Recommended font: Meslo Nerd Font patched for Powerlevel10k«, github.com, repo. Visited: 2025.03.13. URL: https://github.com/romkatv/powerlevel10k/blob/master/font.md.
- Jessica Wang, «dev-environtment-files«, github.com/theRubberDuckiee, repository. Visited: 2025.03.14. URL: https://github.com/theRubberDuckiee/dev-environment-files.
- «Nerd Fonts. Iconic font aggregator, collection, and patcher«, nerdfonts.com, web. Visited: 2025.03.14. URL: https://www.nerdfonts.com/.
- programmingfonts.org, web. Visited: 2025.03.14. URL: https://www.programmingfonts.org/.

